POTATO PUFFS, from leftover mashed potatoes

Have left over mashed potatoes? This is a handy way to switch it up and use them up. Made in your muffin tin, this couldn’t be easier!

3 cups of mashed potatoes
2 eggs
1/3 cup sour cream (optional extra for serving)
1 heaping cup shredded sharp cheddar cheese
2 tablespoons grated Parmesan
2 tablespoons chopped chives or parsley
Salt and black pepper, to taste
1 – Preheat oven to 400 degrees F.
2 – Lightly grease with butter 8 – 9 of the wells of a nonstick muffin pan.
3 – In a medium mixing bowl whisk the eggs then mix in the sour cream. Stir in both cheeses and the chives. Add potatoes and mix well.
4 – Spoon them into the pan filling the cups to slightly below the top.
5 – Bake 25- 35 minutes until they pull away from the sides of the cup and are golden brown. Remove from oven and let them cool 5 minutes in pan. Serve with sour cream if desired.

Best Homemade Play Dough Ever

Non-toxic, non-sticky, never gets hard, and easy to clean up too! Made with simple ingredients from the kitchen, and super simple to make. I guarantee, it’s a play dough you won’t regret having around. (Recipe below)

We have been making this homemade version of play dough for at least 30 years, and I have never found one that is as good as this one. The store bought version costs a lot for what you get, sticks to everything and often gets hard in the can before the kids even get to play with it. Heaven forbid some gets into the rug and trampled in…yeah, good luck with that!

I have first hand experience knowing that this version is a breeze to clean up. When my kids were little, we had a set of bunk beds. The kids would spend hours making stuff with my play dough at their little table in their room. Little did I know that a good sized chunk of it got between the wall and the bunk bed set. Rooms get cleaned, vacuumed and all, but nobody really moves a bunk bed set. Imagine my surprise when we re-arranged the room and there was this big hunk of dough stuck and ground into the rug! To my amazement, it did not get hard, and cleaned right up with some soap and water…and it didn’t even leave a stain. Had it been the store bought plastic version, I know it wouldn’t have come out, and that dough would have been a permanent fixture on the rug.

The other day I was going through a box of my grandson’s outgrown toys. I was surprised to see a zip top bag filled with my homemade play dough. Keep in mind, I hadn’t made it since the other grandkids were here…two whole years ago. The play dough was still soft, hadn’t spoiled at all, and looked exactly the same as the day I made it. Not even a funky junky odor to it. Haha, so I did what any (in)sane gramma would do, I played with it a while just to see. In 2 years it didn’t go bad, now that’s saying something.

This stuff works well in those PlayDough machines; this stuff is easier to push through, and easier to clean up. Just throw them in the sink and wash them up, it doesn’t stick to all the inside parts like the other ‘stuff’, it just dissolves away in the wash water!

BETSY’S HOMEMADE PLAY DOUGH
Non-stick, non-toxic, stays soft for months in a zip lock
3 cups regular white flour
1 1/2 cups salt
6 Tablespoons Cream of Tartar (I have used 5, still came out ok)
3 Tablespoons salad oil
3 Cups water

Put all into a large pot and cook on medium heat, stirring until dough pulls away from the sides of the pan. (You will know it’s ready when it turns into a big ball and everything is mixed in.) Remove from heat and let cool a little. Then knead in food coloring a few drops at a time to get the color you want.

NOTE: I usually split it into 3 or 4, just so the kids have more colors of the dough. This makes about 2 pounds worth. Store in the fridge in a covered bowl, or zip lock bags. Keeps 6 months without getting hard, and can be used over and over again.
QUICK AND EASY CORN FLAKE GOODIES

This quick and easy treat only needs 3 ingredients: butterscotch chips, peanut butter, and corn flakes. This is one of my grandkids favorite treats, and adults love it as well. Best thing too, is that you don’t have to use brand name corn flakes OR butterscotch chips. Store brands work every bit as well, and are every bit as tasty.

1 bag of butterscotch chips
3/4 to 1 cup peanut butter (creamy or chunky, your choice)
5 cups corn flakes

In a *double boiler, or in the microwave, melt together the butterscotch chips and the peanut butter. Stir frequently, esp. if doing it in the microwave!

Measure the corn flakes in a large bowl and set aside. When the mixture is melted, pour the mixture over the corn flakes and mix well to coat all of the corn flakes. Have 2 cookie sheets prepared, lightly coated with butter (it will make it easier to get off the sheets.) Put half of the corn flake mixture on one sheet, and the other half on the second cookie sheet. Use a sheet of waxed paper, or lightly buttered hands, to press the mixture down more onto the sheets. Put into refrigerator to set.

Once it has cooled and set, break into chunks and put into an airtight container, or zip bags, and store in fridge.

NOTES: No double boiler? Take one large pot and fill bottom with about an inch or so of water, have another smaller pan that fits inside the larger one to put the chips and
peanut butter in to melt. I find it easier to do it that way, and the smaller pan, I make sure it has a handle just to make it easier to get out (yes, it’s tilted inside the bigger pan, but it still melts and does the job the same).

ALSO, if you’re a fan of chocolate chips, you can throw a handful in with the corn flakes, before you put the melted mixture in. That way they don’t melt into the
mixture…delish!!

Fun Ideas Using Dollar Store Glow Necklaces

Summertime = picnics, camping, and all kinds of fun activities in the evening hours. One fun thing to use is glow sticks. At the Dollar store, they’re only a buck apiece. We use them to keep track of kids after dark. Boys get one color, and girls another. It’s easy to figure out who’s missing if each gender is wearing the same colors. Kids love the glow necklaces and usually wear them without any complaints. If they complain, have one of the older kids wear one too, and they’ll then want to do it simply because the big kids do.

This is a fun game to play with the glow necklaces. Remember the game where you throw a hoop over a stake in the ground? The same game, only using glow in the dark necklaces for the hoops, and Dollar store solar lights stuck in the ground for the ‘stake.’ Easy too because nobody will trip over the stake in the dark!

Glow necklaces are handy for adults to use too. Not as a necklace though. Throw one on the table to ‘ring’ the drink jug, and you’ll always find it. Use those beverage holders that poke into the ground next to your lawn chair? Ring one around the pole, on the ground, and nobody will trip on it in the dark. (And believe me, I’ve scraped my shins enough on those things to know it’s nice to have them marked where they are in the dark haha). Oh, and if Fido goes camping with you, get one that’s a nice size for around his neck. You’ll always spot him when he wanders away from the campfire!

Recycling Junk Mail Advertising Magnets

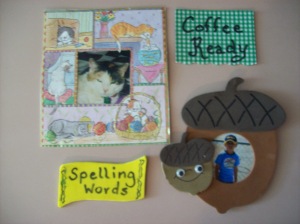
recycled magnets

recycled magnets

I get a lot of advertising magnets in junk mail, I’m guessing that you probably do too. I save them in my junk drawer and use them for many other projects. (Have you ever seen what they charge for a yard of magnetized craft tape?!) These are perfect for personalized refrigerator magnets and other small craft projects using magnets.

The cat picture is a birthday card, with the center picture cut out, and my favorite kitty (that passed on) in the center. My grandson gets a spelling list each week, so he has his own magnet to keep his list handy on the fridge for practicing his spelling words. It’s just made with a piece of scrap colored foam, and a magic marker. Coffee Ready: made from some left over scrapbooking paper. (Saves a lot of time in the evening looking to see if the coffeemaker is set up for morning) The acorn picture frame is brown scraps of foam with googly eyes. They’re all cute, easy to make, serve a purpose, and best of all, they cost nothing but a few minutes of time.

When using the magnets on the back of something, be sure and take a piece of light grade sandpaper, or some steel wool, and rough up the printed side of the magnet. This will give it tooth so the glue sticks on better. These are great projects for the kids (or us big kids too!) With re-purposing those free magnets we get in the mail, and in our phone books, we have free decorations for the fridge for all the holidays. Have fun! Zikki

Free Printable Road Trip Games

car

Car trip games keep kids occupied, and are fun. I know when I was a kid, I loved the different car games, but back then there weren’t printed versions they could check off. These free printable ones not only keep them occupied, they will actually look at the scenery instead of their computer games. Also great for some vocabulary building!

ROAD TRIP SCAVENGER HUNT
This page of free printable scavenger hunt sheets have different ones for different age groups, as well as different types of settings. There’s city, suburbs, and rural, for the older kids. They even have a printable list for toddlers and pre-schoolers with pictures with the word.
Be sure and visit Moms minivan for all kinds of other things they offer: coloring pages, cootie catchers, car song lyrics, etc, etc…all free printables! WoooHooo!
http://www.momsminivan.com/scavenger.html

LICENSE PLATE HUNT:
This site has a free printable of license plate hunt (cross off the name of the state, or province, that you see on vehicles.) You have a choice of USA alone, or USA plates and Canadian plates. On the left hand navigation bar, you’ll find car games. In there they have more to find: 5 Awesome Apps For Family Road Trips, Top 5 Road Trip Games, and 10 Best Car Games For Kids. Be sure and visit minitime for some great articles, and lots of unique ideas for traveling with the kids!
http://www.minitime.com/trip-tips/fun-for-kids/license-plate-hunts-united-states-and-canada

Also at minitime: free printable backseat bingo. All the bingo squares have picture icons of what they are looking for. (Example of icons: church, bus, cows, different road signs, etc) Fun and easy because they can just take a crayon or pencil to mark them off as they go.
http://www.minitime.com/trip-tips/fun-for-kids/road-trip-bingo

WD-40 Saves the Day

Did you know that WD-40 removes pine sap from your hands; or that it dissolves expandable construction foam? I always see the emails with long lists of all the great stuff WD can be used on, but these two I’ve never seen. I figured these two out of pure desperation!

A few years ago, I was under the porch in this horrid, dark, and spooky, little crawl space. I didn’t want to go under there, but when weeding outside, I noticed that some of the old stone foundation on the outside of the house needed some fixing right where the house meets the foundation (which are huge stones put there for foundation walls in the 1800’s). I bought some of that expandable construction foam that is made for that kind of thing. Seemed easy enough, shinny under there, spray it, and I could get out of there quicker. Believe me, I sure didn’t want to hang around and maybe meet up with any snakes under there. You know what they say about the best laid plans…

I shake the can vigorously, and slither and shinny underneath. I should probably mention that I had to slither on my back so I’d be facing the problem when I got there; there was no room to roll over. Ewww, I cringed all the way haha. Aiming the flashlight on the spot, I removed the cap and sprayed it into the crack. Next thing I know, the top of the can breaks and snaps off, and there’s foam shooting out and dribbling big old nasty globs down my hand! OH NO! By the time I could slither back out, that can and contents were glued to my hand. As hard as I tried, it would not come off. (If you think super glue is bad, try construction foam!)

So, I wandered carefully into the house, can stuck firmly to hand. Hmmm, I thought, I’ve heard acetone removes stuff like that. I grabbed a bottle of nail polish remover. Nope, that didn’t work at all! After trying everything from turpentine to paint thinner, I was at a total loss. Then I saw the can of WD on the shop bench and sprayed it all over the can and my hand. I was really relieved that it worked. Grabbing some more rags I worked on my hand until the whole mess was cleaned up. Until that light bulb moment, I would have never thought that it would work on heavy duty construction foam that sets up and hardens that quick.

Another thing I found, that isn’t on the list, is that it removes pine sap really well. (That was pretty much one of those accidental discoveries too.) One of the pine trees had a broken branch that needed removed. After sawing it off, my hands just stuck to everything, and anything, I touched. Acetone didn’t work on that either, and soap was a total joke. So, I tried the WD and it came off right away. I now keep a can in the garage, under the sink, and in the basement….an ounce of prevention doesn’t always work, but a pound of cure often helps!

Heirloom weights and measurements conversion chart

Converting Old Recipes to Modern Measurements
Ever have an old recipe that you couldn’t figure out the measurements, or even the oven temperature? Over the years I kept track of all of the confusing recipe terms, and temperatures, until I had a good list so that I could interpret, and enjoy, all those wonderful recipes my Grandmother used to make.

Butter the size of an egg? Mmmm, well, OK…exactly what size egg are they talking about?! A gill…funny, I didn’t see any fish in this recipe. 2 fingers whoa…whoa…surprise, it’s not 2 fingers deep on the side of a glass, that would be wayyyy too much!

INGREDIENTS:
1 wine glass = 1/4 cup
1 jigger = 1 1/2 fluid ounce
1 gill = 1/2 cup
1 teacup = a scant 3/4 cup
1 coffee cup = a scant cup
1 tumbler = 1 cup
1 pint = 2 cups
1 quart = 4 cups
1 peck = 2 gallons dry
1 pinch or dash = what can be picked up between thumb and first 2 fingers; less than 1/8 tsp.
1/2 pinch = what can be picked up between thumb and 1 finger
1 salt spoon = 1/4 tsp.
1 kitchen spoon = 1 tsp.
1 desert spoon = 2 tsp or 1 soup spoon
1 spoonful = 1 TBS. more or less
1 saucer = 1 (about)heaping cup

TEMPERATURES:
very slow oven = below 300F
slow oven = 300F
moderately slow oven = 325F
moderate oven = 350F
moderate hot oven = 375F
quick oven = 375-400F
hot oven = 400-425F
very hot oven = 450-475F
extremely hot oven = 500F or more

COMMON WEIGHTS:
1 penny weight = 1/20 ounce
1 drachm = 1/8 ounce
60 drops thick fluid = 1 tsp.
1 ounce = 4 1/2 TBS. allspice,cinnamon,curry,paprika or dry mustard
or 4 TBS. cloves or prepared mustard
or 3 1/2 TBS. nutmeg or pepper
or 3 TBS. Sage, cream of tarter or cornstarch
or 2 TBS salt or any liquid
1 pounds worth is:
2 cups liquid
4 cups flour
8 medium eggs with shells; 10 eggs without shells
2 1/2 cups confectioner’s sugar or packed brown sugar
4 cups grated cabbage,cranberries, coffee or chopped celery
3 cups corn meal
2 cups un cooked rice
2 3/4 cups of raisiins or dried currants or cherries

BUTTER:
size of an egg = 1/4 cup-2 ounces
size of walnut = 1 TBS
size of hazelnut = 1 tsp.

Quick and Easy Concrete Planters

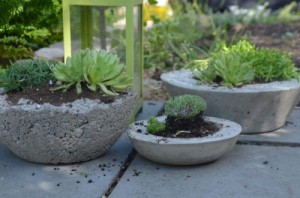
concrete bowl

Concrete planters are easy to make, fun, and indestructable. Not only that, but they’re very inexpensive to make, and you don’t have to be a construction whiz to make them. A perfect solution for any kind of landscaping or garden project. Great for summer plants, plus you can change them up for other seasons (a small decorated tree during the holidays, piled with pumpkins in the fall, etc, etc)

A bag of quick concrete is only around 4 bucks for a 60 pound bag, so depending on the size you make, you could probably do two out of one bags worth! (And just think about what one of these planters would cost if you bought a planter like this already made.)

You need two buckets. One for the outside form, and one to mix the concrete in. You will also need a smaller bucket, or something, for the inside. (That will keep the concrete in the mold and make the center hole for planting later. It creates a ‘wall’ while the concrete sets up.) If you have cooking spray, use that on both surfaces that touch the concrete, it will make it much easier to un-mold later, especially if you want to re-use those buckets to make more. A cork placed in the bottom will stay there while you are pouring the concrete, and removed when the concrete is dry. (This will be a drainage hole later when you have plants in there.) Let me know if you tried this project, and feel free to leave any comments on things you’d do different, or inventive uses you came up with. Have a great day! Zikki

Complete directions, along with pictures and ideas at:

Rustic Chic DIY Concrete Planters

Pick Your Own Fruits and Vegetables

berry

Have you ever wanted to pick your own fruits and vegetables? This is a handy page and guide to help you find a ‘pick your own’ fruits or veggies farm near you! It’s a fun adventure for kids, as well as adults, to pick your own produce and get it at the peak of freshness. This wonderful help is provided by Pick Your Own organization.
Lots of folks don’t know where to go in their area to find a farm that lets you pick your own. If you start up at the top left, in the blue box, you pick your state which then leads you to your area. Easy! If you live outside the U.S. there is also other areas, such as Canada, Germany, U.K., and many more.
Also on this site are calendars, for your area, for crop availability and harvest dates. Click on the crop calendar page, and your state, and see what’s available in your area now (or in the future.) This page also offers: picking tips, info on canning, freezing, jam making and much more.
If you have a farm, and offer this option, you can also add a farm, or recommend one that’s nearby.
http://www.pickyourown.org/